Wednesday, August 5, 2015

Configure Primary and Secondary DNS zone


Primary DNS Zone

Primary zone in the DNS server is the read/write copy of the DNS database. This means that whenever a new DNS record is added to the DNS database either automatically by the DNS clients or manually by the administrators, it is actually written in the primary zone of the DNS server. One DNS server can have only one primary DNS zone.

Since the primary zone of the DNS server is the read/write copy of the DNS database, it must be kept at a location where it remains physically protected from attacks, and remains safe from internal or external network threats and intrusions.

Secondary DNS Zone

Unlike primary DNS zone, the secondary DNS zone is the read-only copy of the DNS records. This means that the DNS records cannot be added directly to the secondary DNS zone. The secondary DNS zone can receive the updated records only from the primary DNS zone of the DNS server.


1.To Insall DNS we are going to Server Manager Click The Manage and Click Add Roles and Features.

and click the Role-based or features-based installation and Click Next button...................

Click the server Roles and then Tick the DNS Server ...................................................

when tick the DNS Server then coming this and click the Add Features...

when click add Features and then starting to Installing ,when Finish the Install then Click the Close button...Now Finish your Installing .

2:Now we are going to their first server or on a server Oignal.
In the main server Everything is made Like:(DHCP,AD DS,DNS) 
We are going to do that DNS Setting . here is Primay Zone Now we are Gonna show Setting of Primary Zone .

1:Click the tools and click the DNS then Coming this Page click the forward Lookup zones and click your Active Directory Name and click Start of Authority (SOA).........................

click Name Servers and click Add .....................................................................

when Cam this page write you Secondary Srver Name and click the button of ReSolve

when click the Resolve then click Ok .


and then click the Name Srver (NS) 


Click Zone Transfers and click the tick of Allow zone transfers After Click the Only to server lidted on the Name Servers tab then click OK.


Secondary Zone: 
Now we are going to second server means Secondary server ,We want this server connected to the main server Until all the things to see on the main server like:client And see how existing clients.................................

in Secondary server ,Open the server manager and click the tools and then click the DNS when Click the DNS Opening this page Right Click the Forward Lookup Zone and click New Zone


 Click Next

zone type : Click the Socondary zone Option and then click Next...........................

Zone Name: in here you must write the name of active Directorye you that you want to connected  our Active Directory is Install the First server or Orignal server , in here write the name of that server.....

and Click finish .

in Here are the things that In the main server or primary server  in DNS zone is available show you the Secondary server or Second server all the thing ,Anything that is on the main server for shows

Wednesday, July 1, 2015

how to change IP address ?

To set the static IP address on your computer with a Windows 8 or Windows 8.1 operating system, follow the steps below: 

Step 1:
Press the Windows  key + D on your keyboard to show the Desktop.
Step 3:
Click Change adapter settings.
Step 4:
On the Ethernet Properties window, select Internet Protocol Version 4 (TCP/IPv4) then click Properties.
Step 5:
Click the radio button beside Use the following IP address: and enter the IP address, Subnet mask and Default gateway on the fields provided.  On the Use the following DNS server addresses: field, enter a Preferred DNS server address.

Step 6:
After setting the static IP address on your computer, click OK then click Close.

Monday, June 22, 2015

How to deploy a new VM on Hyper-V


Create a New Virtual Machine

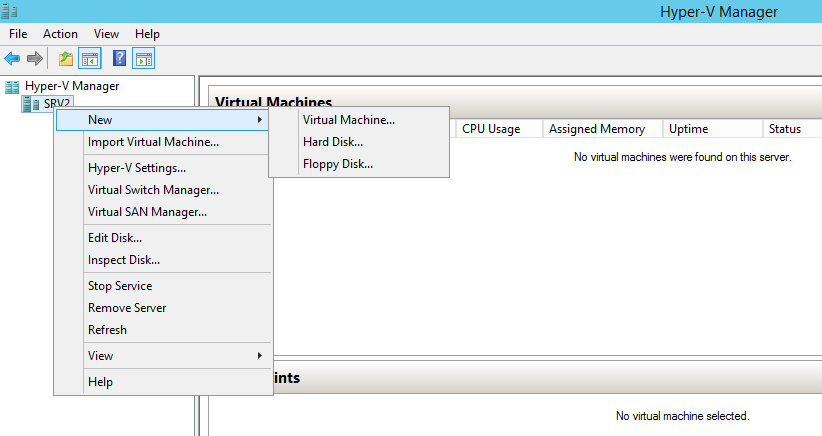
Without any delays let’s open our Hyper-V console and create a new VM. You will need to navigate to your Hyper-V node, right click it and selectNew, Virtual Machine. You can also use the Actions menu from the right side of the panel:
Hyper-V Manager
You will need to set a name for the Virtual Machine and select its location if you haven’t configured a repository for your Servers:
New Virtual Machine Wizard

Specifying Generation and the Amount of Memory

In the following section you will have to select one of the two available VM generations. The first generation was introduced in previous versions of Hyper-V and this was the only one available until now.
Virtual Machine - Specify Generation
The second generation brings some new features while dropping older ones. The new generation has a different firmware and new devices. For example, instead of the PCAT Bios used in the first generation, this new technology uses a UEFI firmware. It also dropped the IDE controller, S3 Video, floppy controller, i8042 keyboard controller, PS/2 mouse, the Programmable Interrupt Timer (PIT), the Programmable Interrupt Controller (PIC), the Super I/O device. Instead of all these older features, new devices were added with increased capabilities. I’m not familiar with some of these technologies so instead I will give you a reference link to an interesting article describing Hyper-V generation 2 VM. The security component has been revised and the new generation of VMs has a lower attack surface. Note that you cannot change the generation of your Virtual Machine once you’ve deployed the Server.
You will have to set the amount of memory that your new Server will use. For demonstration purposes I will create a VM with 512 MB of RAM since I’m already using a VM running Hyper-V and I have hardware limitations.
Virtual Machine - Assign Memory

Network Configuration

An important step when creating a new VM is the networking configuration part. You will need to select a device that will bind to the VM network adapter. You can select a virtual switch connected to your physical interface or create a new virtual switch. We’ve talked about these components in aprevious article.
Virtual Machine - Configure Networking

Connecting a Storage Device

A storage device must be connected to your Virtual Machine. You have three methods available: create a new virtual hard disk, use an existing virtual hard disk or attach a virtual hard disk later. I will choose the first option and create a new 10 GB virtual hard drive on my local disk.
Virtual Machine - Connect Virtual Hard Disk

Choosing an Installation Option

In the last part of this operation you will need to choose an installation option from the following:
Install an operating system later
Install an operating system from a bootable image file
Install an operating system from a network-based installation server
Based on your needs you can further proceed with the OS Installation. I want to show you how to deploy a new Server using WDS once you’ve created a new Virtual Machine using Hyper-V so I will not install the Operating System right now.
Virtual Machine - Installation Options

Virtual Machine Summary

At the end of the Wizard there is a summary of the new Virtual Machine, make sure that everything is correct and proceed with the VM creation. Your new Server will appear in the Hyper-V Manager console, you can now start the Server by clicking the Start button from the Actions menu.
Virtual Machine - Hyper-V Manager Console
The whole process can be completed much faster using Windows Powershell. Hyper-V module is added to Powershell when you install this Server Role. Open up Powershell and type Get-Module -ListAvailable to view the modules available on your Windows Server. Now type Import-Module Hyper-V and then Get-Command -Module Hyper-V to view all available commands. To create a new VM you’ll need to use the New-VMcmdlet. Check out its help page by typing get-help New-VM -full. To create an identical machine as the one we’ve created earlier, you will need to type in the following:
New-VM -Name “Server2″ -ComputerName SRV2 -Path C:\VM\Server2 -MemoryS
tartupBytes 512MB -NewVHDPath C:\VM\Server2\Server2.vhdx -NewVHDSizeBytes 10GB -Generation 2
Hyper-V Manager Windows Powershell
That’s about it for this article folks, I hope we’ve covered all major aspects of VM creation in Hyper-V. We will talk about this technology in future articles that’s why I hope this one will serve you well in learning new things about Hyper-V. Wish you all the best!

Add 1st Windows Server 2012 Domain Controller to Existing Network

In this article I want to show you how to install and configure Domain Controller running the latest Windows Server 2012 OS. Note that for the following demonstration I will be using a Virtual Machine and my test environment works at the Windows Server 2008 R2 functional level.
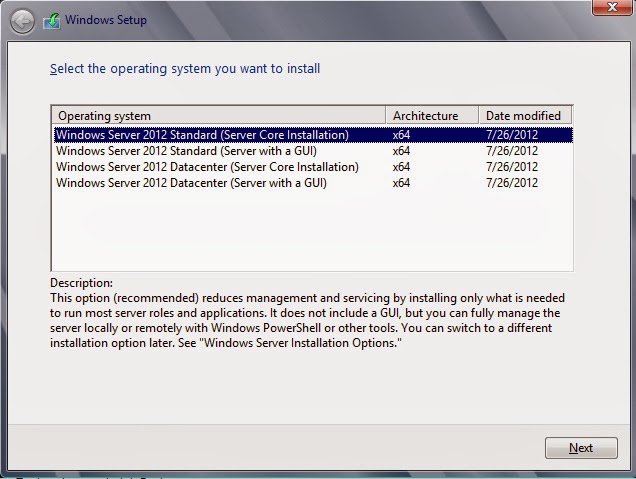
Once you've started the VM and configure all the necessary hardware details, the server will boot and the Installation Wizard will start. I'm using an ISO file attached to my VM that includes multiple Windows Server 2012 versions. From the available Operating Systems I will choose Windows Server 2012 Datacenter (Server with a GUI)
Install Windows Server 2012
Once you click "Next", the installation process will start. You will need to wait until the installation is completed and the server is rebooted:
After the restart, all the necessary components will be configured. This operation will take some time depending on the Server's hardware configuration:
Windows Server Restart
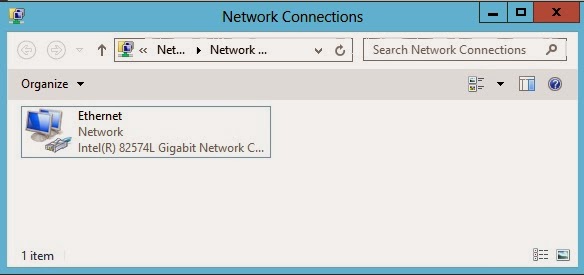
The first thing that we need to do is to set up a static IP address. Navigate to Control Panel\Network and Internet\Network Connections and select the network interface connected to your network:
Set Up Static IP Address
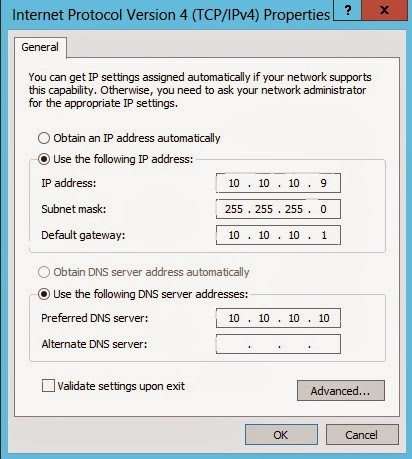
Now right click the network interface and select "Properties", navigate to Internet Protocol Version 4(TCP/IPv4) and set up the IP configuration. Note that you should always use a static IP configuration for your Domain Controllers. If for whatever reason you decide to use DHCP servers for assigning IP addresses, make sure you create a failover infrastructure:
IPV4 DHCP Server Failover Infrastructure
We can achieve the same results using the netsh command from command prompt:
netsh interface ipv4 set address “local area connection” static 10.10.10.9 255.255.255.0 10.10.10.1
netsh interface ipv4 set dnsservers “local area connection” static 10.10.10.10
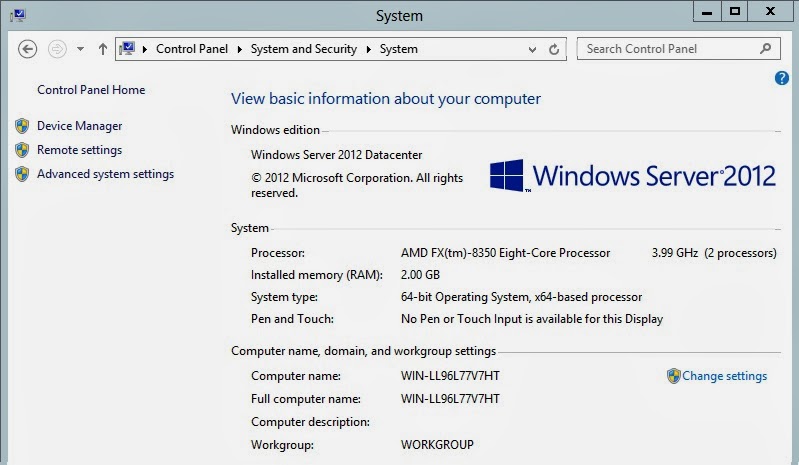
I will also change the name of the server. Navigate to Control Panel\System and Security\System and click on "Change settings" from the Computer name, domain and workgroup settings section:
Change Name of Server 2012
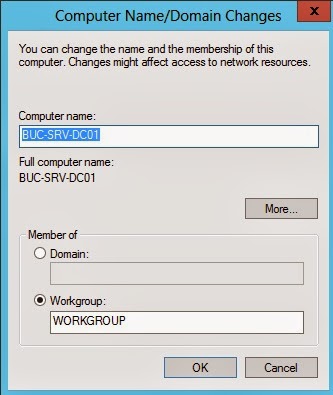
Now change the server's name and press "OK". You will need to restart the server after this step is complete:
Change Name of Server 2012 OK
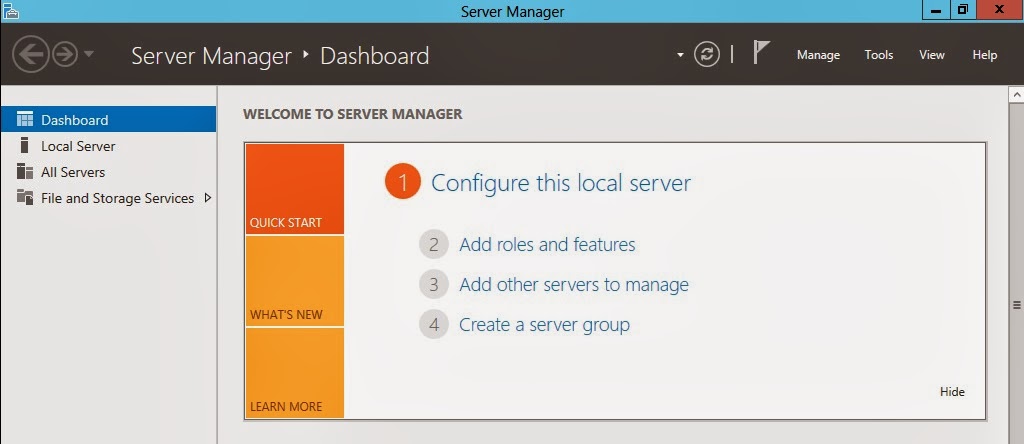
Now it's time to install and configure the Active Directory Domain Services role. Open the Server Manager console and click on "Add roles and features" button:
Server Manager Add Roles
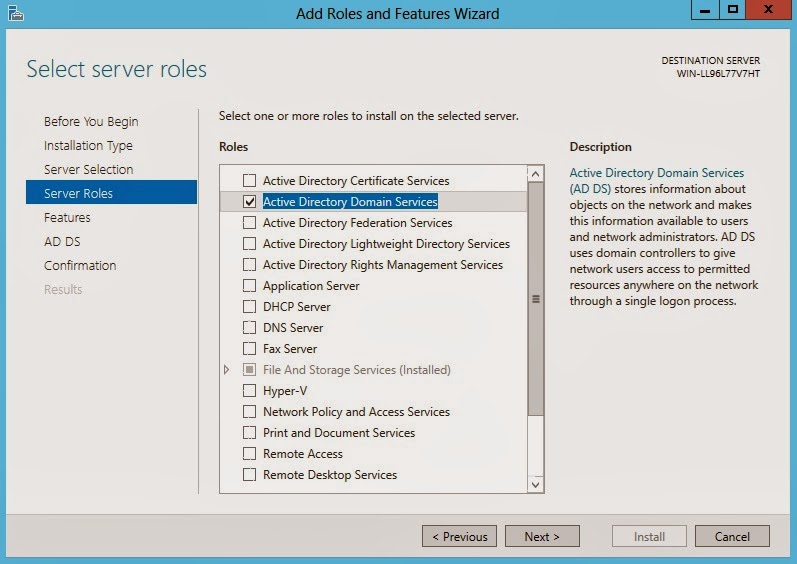
From the roles section, select "Active Directory Domain Services" server role. You can also read the short description available on the right side of the panel:
Configure Active Directory Domain Services
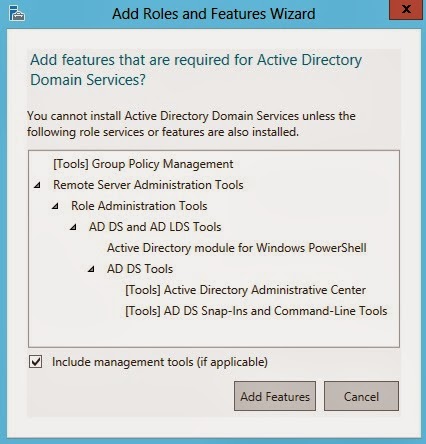
When installing AD DS role, the Wizard will prompt you that additional components will be installed (AD Domain Services and Lightweight Directories Services tools):
Ad Domain Services Add Roles Features Wizard
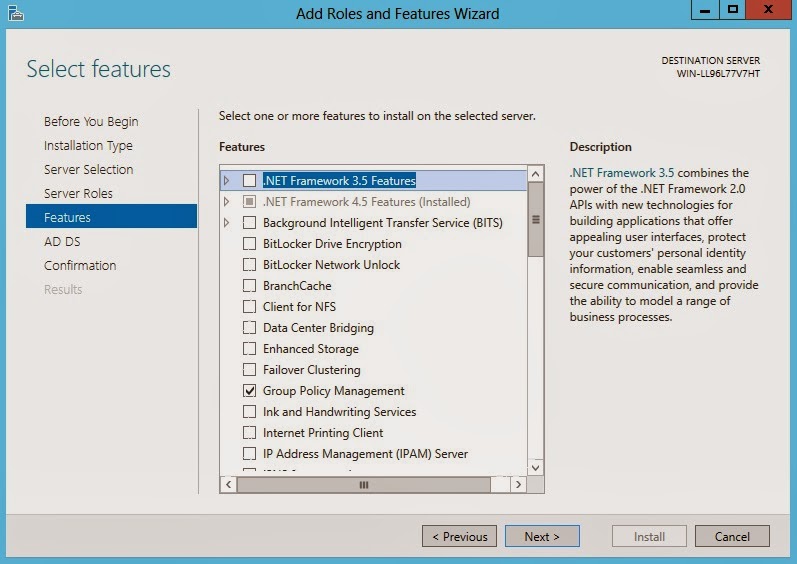
For now, there is no need to install any features, the wizard will automatically select any feature that is needed for the Active Directory installation:
Select Features Active Directory Installation
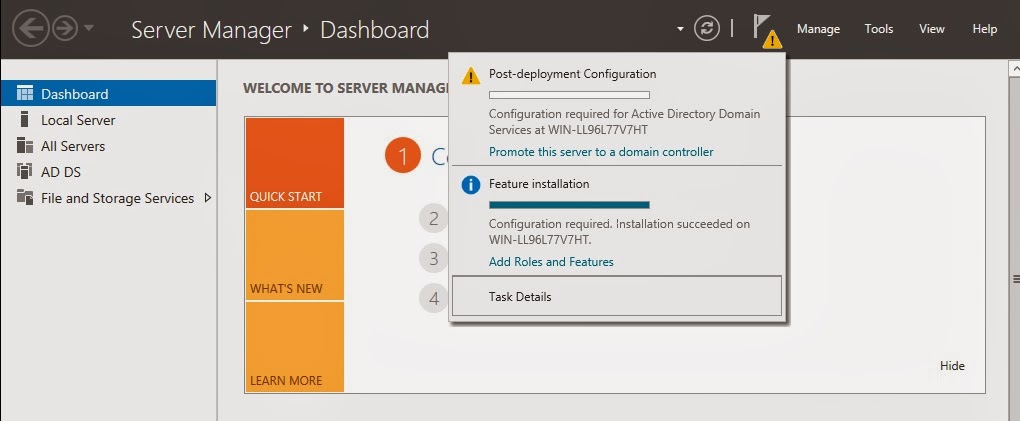
After the installation is completed, it's time to promote the server to a Domain Controller. Note that dcpromo command does not exist anymore and the promotion process is made from the tasks section in Server Manager:
Server Manager Dashboard Tasks
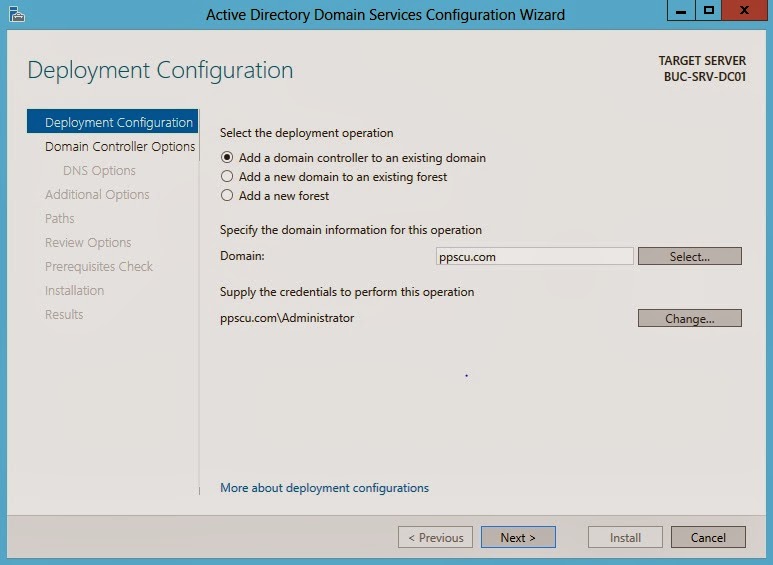
Click on the "Promote this server to a domain controller" link to start the promotion wizard. Select the option "Add a domain controller to an existing domain", specify the AD domain and credentials and click "Next":
Promote Server to Domain Controller
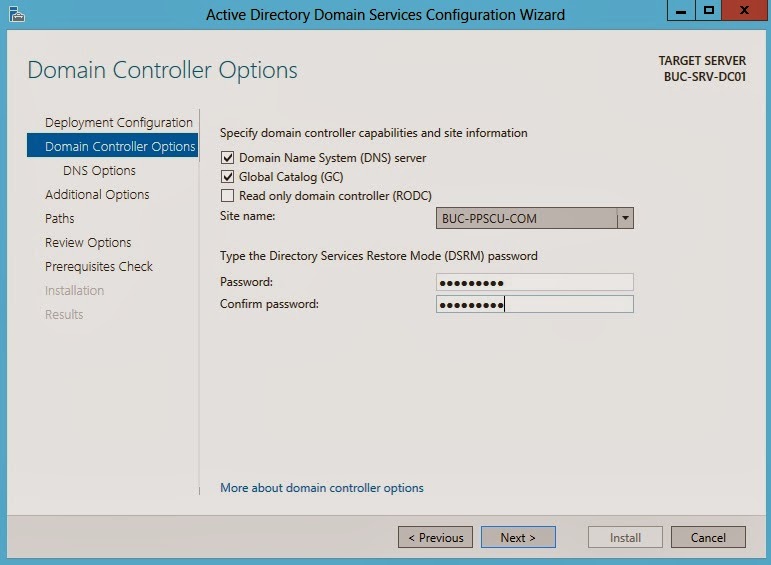
Because I want to migrate all my infrastructure to Windows Server 2012, I will also install the Domain Name System (DNS) service and I will configure this server as aGlobal Catalog (GC). You will need to configure a Directory Services Restore Mode (DSRM) password:
Directory Services Restore Mode Password
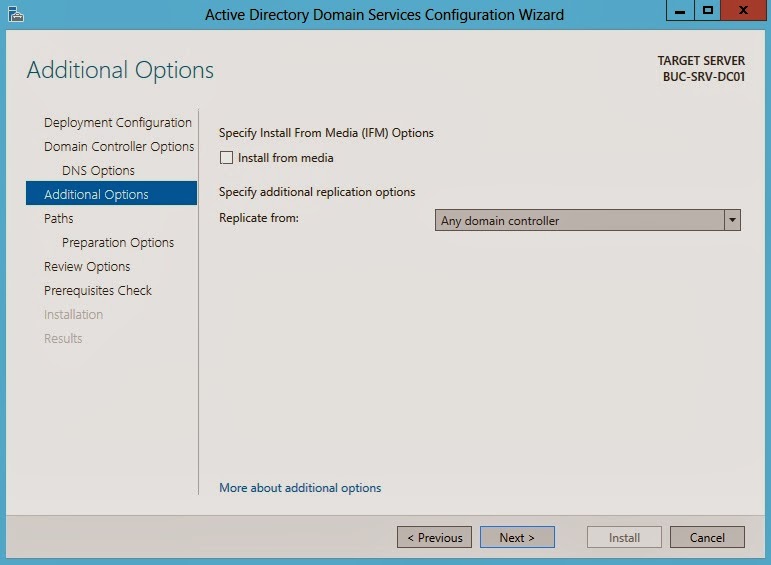
In the following section you'll need to specify the replication mode. If desired, you can enable the Active Directory replication from a specific Domain Controller:
Specify Replication Mode
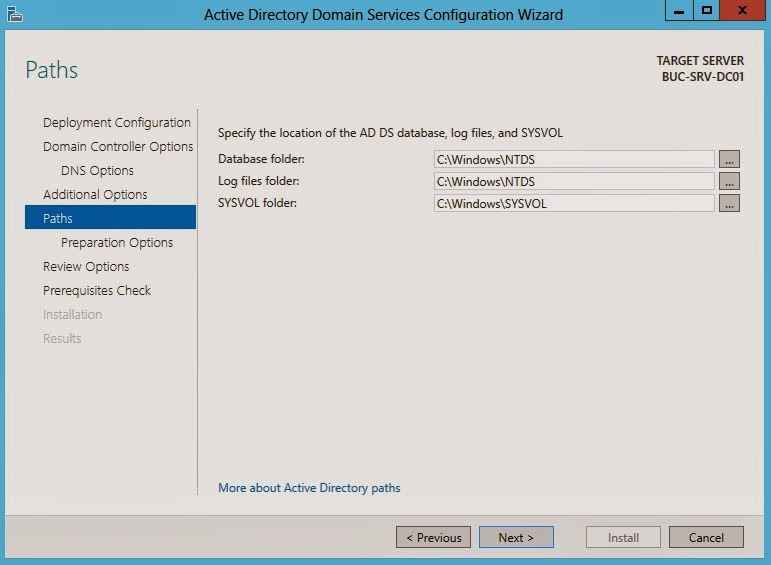
Next, you'll need to specify the Database, Log Files and SYSVOL folders:
Specify Databas Log Files and SYSVOL
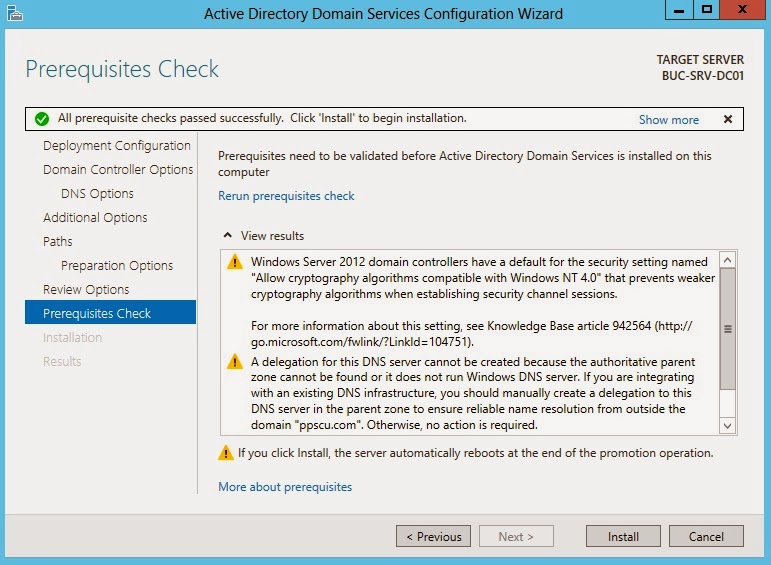
The server will perform a Requisitions Check and if this operation is completed successfully, the installation process will begin:
Requisitions Check Installation
After the server is restarted it will be fully integrated with Active Directory Domain Services.
This is how you can add a Windows Server 2012 DC to an existing domain. Note that my domain is still running at the 2008 R2 functional level. Once I upgrade all my Domain Controllers to Windows Server 2012, I can rise the domain functional level. This article should be helpful when performing a domain or forest migration from Windows Server 2008 to Windows Server 2012.