Sunday, May 10, 2015

Whether you want to be on the Internet without footprint

This is why we teach them how to surf the Web on the Internet easy
Is such a way that when we can safely surf the Web.
Yes such a way that it can spy on them who will work
No one knows that you're after, use surf the Web.

1:go to click the menu google chrome like this.see the picture

2:after click the menu then click the New incognito Window see here 


3:after click New incognito window A screen shot .See the picture.
in here you can any thing search or any where you go no body see you .

Of course, one thing to say you should be careful never safe to surf the Web on the Internet has increased the risk that your security is in danger.

۵ روش برای امن کردن اکانت گوگل


Account Recovery نصب کنید

Account Recovery بهترین روش برای مواقعی هست که اکانت شما هک شده یا پسورد ایمیل خود را گم کرده اید.
 سپس مطابق تصویر در قسمت Setting بر روی Account recovery options کلیک کنید.

سپس گوگل شما را به صفحه ای می فرستد که می توانید شماره موبایل خود یا یک ایمیل دیگر برای مواقع ضروری قرار دهید که در مواقعی که پسوردتان رو گم می کنید یا هک می شوید بتوانید اکانت خود را بر گردانید.

قابلیت -step verification را فعال کنید

قابلیت تایید ۲ مرحله ای اکانت گوگل دقیقا یک لایه ی دومی امنیتی برای اکانت شماست.این قابلیت جایی بدرد می خورد که بطور مثال کسی یا خود شما بخواهید از سیستم ناشناس دیگری وارد اکانت گوگل شوید،می توانید از طریق موبایل تایید کنید که خودتان هستید .
سپس روی گزینه ی Edit در کنار ۲-step verification کلیک نمایید.بعد از آن یک سری اطلاعات مثل شماره ی موبایل شما را خواهد گرفت و بعد از آن خودتان یا شخص دیگری بخواهد از سیستم دیگری وارد اکانت شما بشود یک شماره ی چند رقمی به شما اس ام اس می شود و شما با وارد کردن آن شماره می توانید وارد اکانت خود شوید.

تعیین پسورد های مختلف برای برنامه های مختلف

شما با فعال کردن این قابلیت می توانید پسورد های مشخصی برای برنامه های وابسته به اکانت خودتان فعال کنید بطور مثال می توانید یک پسورد مجزا برای Google Talk درست کنید که پسورد اصلی اکانت شما نباشد و فقط مختص Google Talk شما باشد.
سپس بر روی قسمت Authorizing applications and sites کلیک کنید و در آنجا می توانید لیستی از برنامه هایی که با اکانت شما مرتبط هست را ببینید و در قسمت Application-specific passwords پسورد های بخصوص برای قسمت های مختلف انتخاب کنید.

از پسورد های قوی استفاده کنید

سعی کنید از کلمات متداول که در دیکشنری ها پیدا می شود و همچنین ارقام خاصی مثل تاریخ تولد و شماره شناسنامه و … استفاده نکنید ، سعی کنید پسوردی که انتخاب می کنید معنی خاصی ندهد و تلفیقی از حروف بزرگ و کوچک ، ارقام ، علائم باشد مثل : OtT2359%$8*#^:)
شاید خیلی برای یادآوری سخت باشد ولی در عوض اطمینان دارید که به بالاترین درصد امنیت رسیده است.

HTTPS را فعال کنید

پیش پا افتاده ترین کار همینه که پروتوکل HTTPS را فعال کنید نیازی نیست شما بعدش کاری کنید این پروتوکل اطلاعات رد و بدل شده ی شما را امن خواهد کرد،برای فعال سازی این قابلیت مطابق شکل زیر عمل کنید:

Saturday, May 9, 2015

how to open your website in CMD?

ترفندستان دریچه
Be sure to open your Web browser you use. In some cases there may be users of the system due to a viral or delete the browser, a little confused. In such case the only thought that comes to mind is that you install a new browser on your system. RSS Feeds IT training has prepared through the cmd window, you can open your site. Be sure to ask how the command prompt in Windows run a site. So it is better to not lose time and start training their sites and surf the Web, you open the command prompt. It should be noted that through the command prompt to run the Web browser used by default.

1:Beginning you most Press windows+R or Run.

2:write command prompt or CMD press enter .you will write Start and withe your website Name
press enter

See here


Gather all the settings in one place Windows 8.1

Some users who need a lot of settings for Windows 8.1 is dealt

Is there a way Windows 8.1 when all the settings to find a place that does not need to find ways Mekhlef?
Yes, if we follow the Windows settings look very time consuming to find the easy way


1:Beginning your make folder in your desktop.................

2:Rename your folder And also the following named New Folder Replace...
               GodMode.{ED7BA470-8E54-465E-825C-99712043E01C}
3:After you change the default folder name as Inter your image.............


Thursday, May 7, 2015

Opening your files with different apps


When you open a file in Windows 8, it will usually open with a Start screen app—even if you opened it from the Desktop. But you may not always want this. If you prefer to work in the Desktop, you can choose to open the file with a Desktop app. For example, a JPG picture opens in the Photosapp by default, but you can open it in Windows Photo Viewer instead.
In this lesson, we'll show you how to open a file in a different app and also how to change the default app so a file will always open in your preferred app.
To open a file in the default app:
1.      In Desktop view, double-click the desired file.

2.      The file will open in the default app. In this example, it opened in the Photos app.

To open a file in a different app:
Sometimes, you may want to open a file in a different app without changing the default. For example, you may want to open a photo with the Paint app to crop or resize it.
1.      In Desktop view, right-click the desired file.

2.      From the drop-down menu, click Open with and select the desired app.


3.      The file will open in the app you selected.
To change the default app:
You may prefer to change the default app for certain types of files so they'll always open in the new app when you double-click them. For example, you may want your photos to always open in Windows Photo Viewer instead of the Photos app.
1.      In Desktop view, right-click the desired file.

2.      From the drop-down menu, click Open with and select Choose default program....

3.      Select the desired app. If you don't see the app you want, click More options. In this example, we want to open the file in Windows Photo Viewer.

4.      The file will open in the new app. The next time you double-click a file of that type, it will open in the new default app.


Tuesday, May 5, 2015

How will Windows 8 faster? (8 Tips to improve the speed of Windows


How will Windows 8 faster? (8 Tips to improve the speed of Windows
 -
Windows 8 is much faster than previous versions of Windows, as well as its launch is also higher.
Of course, Windows 8 also has other positive points! The little space that occupies the Windows 8 desktop dream project interesting and quite impressive and functional!
As with all versions of Windows, Windows 8 also has a number of different settings that you can manipulate the settings easily and quickly add Windows 8.
Guidance that we are writing to you in previous versions of Windows, but Windows 8 applications, an interesting trick hidden in his sleeve and many words to say.
Some tricks when using Windows, there is no magic trick, but it is hidden from your eyes I do not worry because we will learn them all.
1) Disable animated time-consuming:
Windows 8 (and Windows 7). When you have a minimum and maximum program size (minimize, maximize) to convey Also, if you run a program or close the animation effects used.
At first glance this dramatic effects very eye-catching and interesting look, but you will look deeply into it to run the animated effects, the lost.
You can easily disable the animation effects and after this you will see how much faster and Bdvt waste of time windows will open and close Windows.
To disable them just on Kyld Windows (Windows key) button and the "SystemPerformanceProperties" type, and the key "Enter" button.
We have identified below the window, one option is to remove Tykshan Hara.
Also, you may disable you like other animation effects like Fade or slide menus and tooltips fade or as a slide show.
By doing this you will see that immediately improve the speed of menus and tooltips.

2) to identify the applications that are low speed and a lot of resources involved are:
Windows 8 task manager (task manager) has a new design that will easily allow you to programs that reduce the speed of your computer you like.
To open the task manager, the taskbar, right-click the desktop and select task manager.
If you do not see the full details of the option (details option) click here.
Programs that use multiple sources and a lot of work marked a distinct light.
Note that it is very easy to work with and clearly plans to run a lot of your computer's resources become involved are listed.
It also put a simple list of (simplified list) software, which is too short to give information to the display style "old style display processes" (old-style processes list) say.
If you are "old-style process list" you prefer, it's still available on the Info tab (Details tab) is.

3) manage startup programs (Startup Programs):
Task manager, Windows already allows you to easily program when the computer is turned on, along with automatic set up disable. To achieve this possible, tab on startup (Startup tab) click.
Windows also automatically analyzes and analysis of time it takes to run the program deals!
The data in the column named "column effect in Startup" (Startup impact column), you show.

4) The use of security applications:
Rather than security suites "third-party security", which often greatly lowers the speed of your computer, the program is complete and functional safety (security applications) use.
Currently available anti-virus software on your own first, but it Vyndvzaz Windows Defender (Windows Defender) call
It should Zkrst that the antivirus software is basically the same as the popular "Microsoft Security Essentials application" is.

Windows 8 is also a new feature called Smart Screens (SmartScreen), which are programs that you download from the Internet, the confidence in the safety of the viral Nbvdnshan (how trustworthy); analysis of the
In Windows 8, like previous versions of Windows, a security wall (firewall) that blocks incoming connections to the Czech
If you need high security, you also need to be more security features and options, we recommend that you as professional users, the full program and functional safety (security programs) on the Windows install and convenience rely on it.
5) Changing the settings Power (Power Settings):
Windows 8 using the implementation of programs related to power, battery life and performance by prioritizing appropriate and rational planning.
To view and access to power settings (power plan settings) you have the Windows key (Windows key) on the keyboard and press the "Power Plan" type into the box opens, click "Settings" and finally click "Enter" button
The default mode, a state of balance and balance is considered. Windows, fully automatically when the need to use and exploit the maximum speed of Nice, speed CPUs (CPU's speed) reduces and it saves a lot.
However, much of this good thing Nyst.hty computer professional dedicated to computer games (computer games geared for professional and high-performance) to browse the web, take a little time and it does not accord with reason that, for this little delay, all activities dedicated CPUs to open web pages, and to push it comes!
However, each of the modes that you choose, make sure that the "optimization of power" (Power saver) does not use. But if you're the type of person that battery life is important to you, be sure to use the "power optimization" (Power saver) use!

6) Put the computer in sleep mode (Sleep):
One of the hottest and most controversial aspects of Windows 8 solution Find button off "Shut Down" is! Easily in Windows the "Sleep" button, you switch off the "Shut Down" in the menu is hiding!
The reason for this is that Microsoft wants to encourage you to turn off the computer instead of using the "sleep mode" instead.
When you use the sleep mode, your computer automatically to a "low-power state" appears.
That was enough power to keep the programs running and to keep the programs that you have running and all this in the "RAM" your computer is saved.
When you come back to see your computer, immediately and without delay Annam previous work is no change in the running before the result is good. By using sleep mode instead of shutting down, dramatically you increases your speed! Since the shutdown, you must re-run the previous program, but in the sleep mode does not work! You sleep under an option button for "power button" in the "Settings charm" you will find.
Keys on the keyboard "Windows Key + C" button and now the "Settings" click.
Now click on the "Power" mode and "Sleep".
Power button for your computer may automatically default to run is scheduled sleep!
You can easily click on the "Choose what the power buttons do option" in the "Power Options window" (mentioned above) to change the extension.

7) Optimize your hard drive:
Windows 8's "Disk Defragmenter" standard, which is now called (drive optimization tool) "Optimize Drives tool" there.
To achieve it, the keyboard button for "Windows key" button inside the "Defragment" type, and now the "Settings" button and then click on the "Enter" button pressure.
One thing to note that Windows 8 will automatically default, once a week, you drive optimization (defragments) is. However, if you move your Windows files sustained many of the hard drive partition to another partition your pass, you may want early default, optimize hard drive do. Again, as with previous versions of Windows, clicking on the button analysis "Analyze button" can analyze the files on your system.

8) controls the indexing Windows:
Windows Indexing Service (Windows indexing service) automatically scans files on your computer, and changes to continuous monitoring and supervision are lined pool service possible and allows you to quickly and without delay, and Most importantly, no waiting! , Easily search files your own!
Indexing, and uses a portion of CPU time is involved, (although this in mind that if this change in your files more time engaging increased CPU is) so if you have the ability to disable your computer's CPU speed goes up dramatically.
If you're one of those people who constantly and regularly search for files "Files search" on the start page (Start screen) or the browser you're using Windows, you do not need to disable indexing of Windows do not!
You should only disable the indexing is generally not used for searching files.
To disable this feature, Start (Start) button, the box is "services.msc" button to enter the "Enter" button Dhyd.askrvl the page, navigate down to the bottom of the page Nmayyd.dr the bottom of the "page" is located on the right and click "Properties" is selected.

From the "Startup" option "Disabled" select, then click on the "stop" and finally click "OK" button!

You may instead want to disable the Windows Indexing Service to search remote files and folders that are within the parameters of the contract will pay serious attention profile and you change it Hara folder full of files You would not want to appear different to the search and not for the search, especially those files that you Thvlshan continuous change, you can delete them from indexing Windows.
To control these settings, "" button and enter the phrase "" type and the "" and finally click "" click. To control these settings, "Windows key" button and enter the phrase "Indexing" type and the "Settings" and click the "Enter" look.

Sunday, May 3, 2015

آموزش Run


حتما شما نيز تا به حال با Run موجود در ويندوز خود سروکار داشته ايد. براي استفاده مفيد از Run دستورات خاصي وجود دارد که هر يک کار مفيدي را انجام ميدهد. به عنوان مثال دستوري که اطلاعات سخت افزاري و هم چنين اطلاعات سيستمي اعم از رم و کارکرد CPU و غيره را به نمايش ميگذارد. دانستن اين دستورات ويندوزي بهتر و مديريت آسانتر را برايتان به ارمغان خواهد آورد.
با استفاده از کليدهاي ترکيبي Win+R و يا رفتن به منوي استارت وارد محيط Run شويد.

حال کافي است هر يک از اين کدها را در آنجا وارد کنيد:

REGEDIT
با تايپ اين دستور رجيستري ويندوز باز ميشود وبا استفاده از ان متوانيد قسمت هاي مختلف ويندوز را بنا به سليقه و خواست خود تغيير دهيد .متذکر مي شويم در رجيستري چيزي را که نميدانيد حذف يا تغيير ندهيد .

CMD
با تايپ اين دستور محيط سيستم عامل داس روبروي شما ظاهر مي شود و مي توانيد فرمان هاي خود را براي اين سيستم عامل تايپ نماييد.

PERFMON
با تايپ اين دستور برنامه سيستم مانيتور اجرا مي شود و در آن جزيياتي در مورد فضاي اشغال شده از رم و يا مقدار بازدهي سي پي يو و همچنين مقدار اطلاعات خواننده شده از هارد را براي شما به صورت نمودار بيان مي نمايد.

SYSEDIT
با تايپ اين دستور ويرايشگر فايل هاي سيستمي اجرا مي شود و مي توانيد آنها را ويرايش نماييد .متذکر ميشويم در صورت تغييرات اشتباه ممکن است سيستم شما بالا نيايد .

FIREWALL
با تايپ اين دستور مي توانيد ديواره آتش ويندوز خود را فعال ويا غير فعال کنيد . فعال بودن ديواره آتش براي امنيت در شبکه ونيز جلوگيري از ورود هکرها به سيتم شما بسيار موثر است.

Drwtsn32
با تايپ اين دستور برنامه دکتر واتسون اجرا مي شود اين برنامه در گزارش و همچنين عيب يابي مشکلات نرم افزاري بسيار مفيد مي باشد .

NTBACKUP
با تايپ اين دستور برنامه گرفتن نسخه پشتيبان بر روي سيستم شما اجرا شده و مي توانيد از سيستم خود نسخه پشتيبان تهيه نماييد .

DISKMGMT
با تايپ اين دستور برنامه مديريت ديسک شما اجرا شده و مي توانيد با استفاده از آن ديسک سخت خود را مديريت نماييد ويا هر يک از پارتيشن ها را حذف نماييد .

DEVMGMT
با تايپ اين دستور ميتوانيد سخت افزار هاي نصب شده بر روي سيستم خود را بازبيني نماييد و يا يک از آنها را حذف و يا نصب نماييد .

EDUCEDIT
با تايپ اين دستور مي توانيد يک کاراکتر بسازيد و يا يک کاراکتر را ويرايش نما ييد.

Services
با تايپ اين دستور مي توانيد يکي از سرويس هاي ويندوز را لغو نماييد يا يک سرويس جديد به آن اضافه نماييد .

MSCONFIG

با تايپ اين دستور ميتوانيد نرم افزارهاي را که در هنگام بالا آمدن سيستم بر روي قسمت سيستم ترايي ويندوز قرار مي گيرند غير فعال کنيد .ضمنا اگر سيستم شما دير Shut Down مي شود به اين قسمت سري بزنيد.

Basic PC shortcut keys


Shortcut Keys              Description

Alt + F                File menu options in current program.

Alt + E               Edit options in current program

F1                      Universal Help in almost every Windows program

Ctrl + A            Select all text

Ctrl + X            Cut selected item.

Shift + Del        Cut selected item.

Ctrl + C            Copy selected item.

Ctrl + Ins          Copy selected item

Ctrl + V             Paste

 Shift + Ins        Paste

Home               Goes to beginning of current line.

 Ctrl + Home   Goes to beginning of document.

 End                 Goes to end of current line.

 Ctrl + End      Goes to end of document.

Ctrl + End      Goes to end of document.

 Shift + Home  Highlights from current position to beginning of line

. Shift + End    Highlights from current position to end of line.

 Ctrl + Left arrow      Moves one word to the left at a time.

 Ctrl + Right arrow    Moves one word to the right at a time.

Saturday, May 2, 2015

Troubleshooting Tips for Windows 8.1 Remote Desktop Connection Problems


Here you will be finding basic and simple troubleshooting tips for Windows 8.1 and Windows 10 Remote Desktop connection problems. You can apply and check every methods mentioned below when you can’t connect to a Windows 8 or 8.1 computer with RDP client from another computer. Understanding the requirements of RDP (Remote Desktop Protocol) and how it works will solve most of the problems.  Remote Desktop connectivity allows to connect a particular network computer desktop remotely with almost all control (as sitting front of the desktop) through the local network (even WAN and internet too). But when you face an issue in connecting a Windows 8.1/10 from Windows 7 or XP, then this post would be helpful.
Obviously the basic requirement for RDP is, proper networking. Make sure the source and destination computers are in proper network and they can communicate. To test the network connectivity easily, ping the Windows 8.1 computer that you need to take remote desktop connection. As default, the ping response is blocked in the Windows firewall,  enable it first to check the network connectivity by pinging.
Basic Troubleshooting Tips for Windows 8.1/Windows 10 Remote Desktop Issue
Though the following screenshots taken from Windows 8.1, still it is applicable for Windows 10 since the settings unchanged in new Operating System. You can follow these same methods on Windows 2012 R2 server too.
1) Enable Remote Desktop to Accept the connection
a) By default remote desktop connection is blocked in Windows 8.1 or 8 computers. It will not accept any incoming RDP connections until it is enabled manually.  Firstly as troubleshooting method, do allow the incoming remote desktop connection or verify whether it’s enabled already.
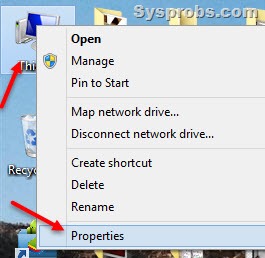
To do that, right click on the My computer (check this guide how to show My computer icon on desktop) andProperties.


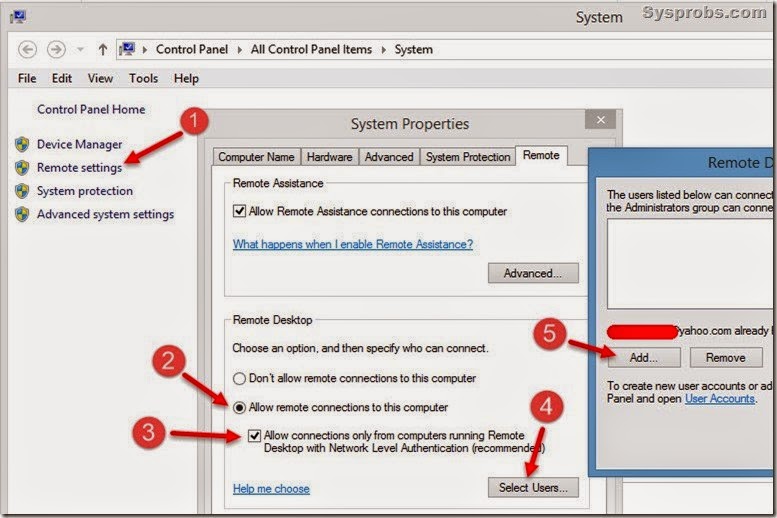
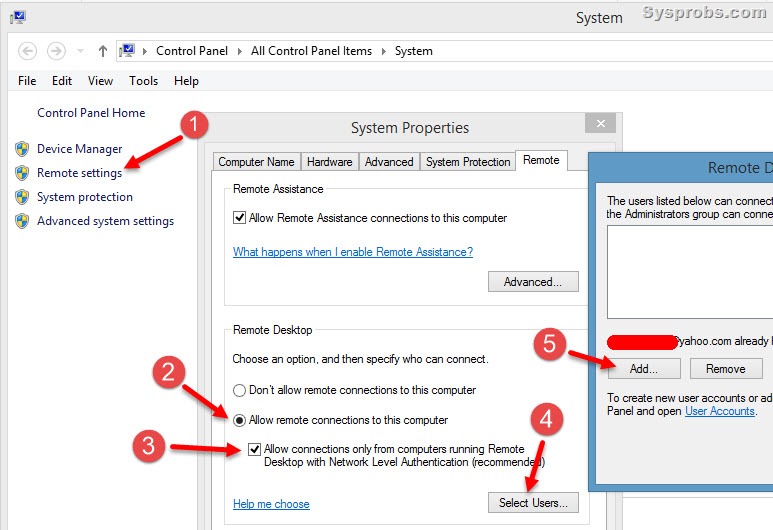
b) Click on Remote settings (1) and enable the radio button to accept RDP connection (2). By default the‘Allow connection only from ……Network Level Authentication (recommended)’ would be selected.  This is the most secure way of allowing RDP connections. Removing the tick will allow the RDP connection even without Network Level Authentication.  If this tick is selected (3), then only the Remote desktop clients and apps which support Network Level Authentication (Windows 7 and later versions) can take RDP connection to particular Windows 8.1/10 computer. In this case, if you need to take RDP connection to particular Windows 8.1 computer from Windows XP or Vista (without latest RDP clients with Network Level Authentication), that will not work. Read more about what type of RDP connections you can allow fromMicrosoft site here.

If you still need to manage a Windows 8.1 or Windows 10 computer from XP and Vista computers, you can untick “Allow ….Network Authentication” checkbox.
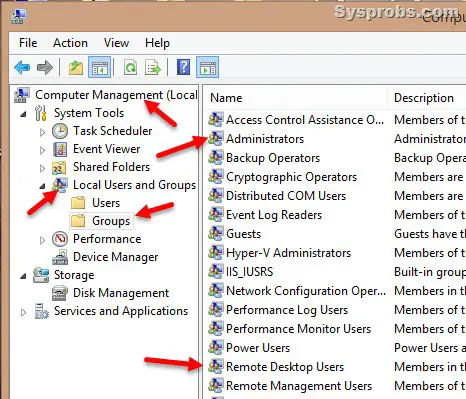
c) Usually the users in Administrators and Remote Desktop Users will have the access to take remote desktop connection to particular Windows 10/8.1 computer. You can check the users under Local Users and Groups  in computer management. Right Click on My computer and 
select Manage to get this option.
2) Check The Firewall
Remote Desktop connection works through TCP port 3389 which is blocked in recent Windows Operating Systems by default. But when you enable RDP on a Windows client or server as shown in step 1.a, the OS will add Remote Desktop connection protocol in the firewall to allow incoming connection. But if you are still facing the problem on particular computer or others can’t connect to your computer by RDP even after it’s enabled properly, it is recommended to check the Windows firewall.
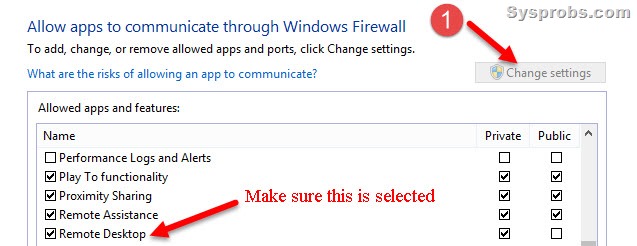
To check the Windows firewall, go to Control Panel and access Windows Firewall. Open the ‘Allow an App or feature through…’ option as below.

Here you must find that Remote Desktop connection is ticked to accept the RDP protocol on Windows 10 or 8.1. If it is not selected, click on ‘Change Settings’ then enable it.

If you are using other third party firewall software like Comodo, or other network threat protection software, you must check the firewall settings of specific programs to enable incoming Remote desktop connections (RDP protocol TCP 3389).
3) There is a Service You Must Check
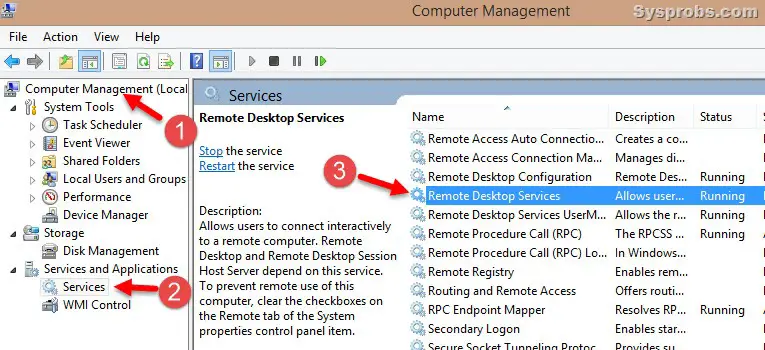
There is a Windows service called ‘Remote Desktop Service’ which should be running to allow RDP connection. It doesn’t matter whether you have enabled it properly and checked the required network/firewall settings, the remote desktop connection will not work if the RDP service is not running on the destination computer. It’s a default Windows service from Operating System which is set to start and run automatically. But as an troubleshooting steps, you must check and make sure this service is running.
Access the Services (from Computer Management) and check the service state. You can start it manually if it’s not running.

4) Try This If Remote Desktop Connection is Slow
Sometimes the RDP connection will be slow and the display performance would be poor due to slow network connectivity. If you use Windows 8.1 remote desktop connection through WAN (Wide Area Network) or internet, then you will be facing this issue.
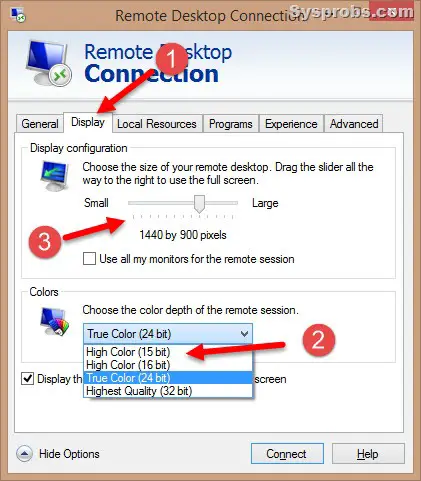
Usually RDP connection is used for basic tasks to do over the network and not for any multimedia or high graphical required activities. Therefore the screen resolution and color depth settings can be reduced to have better experience in slow network connection. To do that, before making the connection, change few settings in display properties of RDP client in Windows 8.1 or 10.

Changing the settings to lower color depth (15 bit in Windows 8.1 as marked by 2) in Remote Desktop Connection program will improve the performance by using minimal bandwidth in slow network connections. Also, reducing the display (in pixels as marked 3) resolution can help in seeing the destination computer in smaller/limited screen size which can hugely improve the performance in slow network.
5) Connect Remote Desktop to Windows 10 from Outside Network – Internet
If you like to take Remote desktop connection to your Windows 10 or 8.1 through internet from anywhere in the world, then there are specific configurations need to be done on the internet router. Here are the few considerations.
1) The port forward should be enabled on the internet router to forward any incoming RDP connection on public IP (or DNS name) to internal Windows 8.1/10 computer which you like to connect via RDP over the internet.
2) Your home/office internet should have public static IP or DynDNS with dynamic IP address. Because your internet modem gateway should have a valid static IP or name to be able to accept connection on internet.
Though Sysprobs will be publishing a latest guide about setting up a home router for RDP connections, still you can find a nice guide here about how to set up Windows 8.1,10 and 2012 R2 RDP to accept from internet.
6) Third Party Free Apps
If you are looking for free third party remote desktop connection programs for Windows 10 and 8.1 for free, here are the few suggestions. These programs will work through internet also without any changes on your home internet router. But unlike Microsoft’s built-in RDP client, some of the free programs require someone to allow the RDP connection from destination computer.
Hope this guide would be helpful in troubleshooting Windows 8.1, 10 and 2012 R2 server remote desktop connection issues on your home or office network. Also, there are few tweaks and other third party programs mentioned here to over come the connectivity issues from internet and WAN.